Setting up Validator Keys
🌱 1. Obtain ETH
To make the deposit transaction(s), you will want your 32 ETH or more in a single hardware wallet address.
🔑 2. Generate validator keys
Before continuing please have the following:
- Hardware wallet address or Safe multisig wallet address: This is for your Withdrawal Address. It must be in checksum format, which means some letters are UPPERCASE. If needed, validate your address's checksum format against a block explorer, such as https://etherscan.io
- Browser dApp Wallet (i.e. Rabby or Metamask) with 32 Ethers or more for each validator
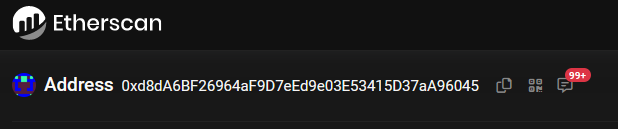
Example of Vitalik's address in checksum format
Before continuing please understand the following:
- The Withdrawal Address is:
- where your ETH is returned upon "voluntary exiting a validator", or also known as full withdrawal.
- where you receive partial withdrawals, which is where any excess balance above 32 ETH is periodically scraped and made available for use.
- As this is permanent once set, triple check your address.
- DO NOT USE AN 🛑 EXCHANGE ADDRESS 🛑 AS WITHDRAWAL ADDRESS.
Offline Key Generation Best Practices: The mnemonic seed (24 words) to your validator should be protected by keeping them offline. Use Tails OS (see option 3) or a Linux Live USB with ethstaker-deposit-cli (Option 1) or Wagyu to generate keys.
If this is not possible, at least physically disconnect from the network by unplugging ethernet cable or disconnecting from Wifi.
Ways to create your validator keys:
Option 1 for Ubuntu - ethstaker_deposit-cli
1. Download ethstaker_deposit-cli from Github.
#Install dependencies
sudo apt install jq curl -y

#Setup variables
RELEASE_URL="https://api.github.com/repos/eth-educators/ethstaker-deposit-cli/releases/latest"
BINARIES_URL="$(curl -s $RELEASE_URL | jq -r ".assets[] | select(.name) | .browser_download_url" | grep linux-amd64.tar.gz$)"
BINARY_FILE="ethstaker_deposit-cli.tar.gz"

echo "Downloading URL: $BINARIES_URL"

cd $HOME
#Download binary
wget -O $BINARY_FILE $BINARIES_URL
#Extract archive
tar -xzvf $BINARY_FILE -C $HOME
#Rename
mv ethstaker_deposit*amd64 ethstaker_deposit-cli
cd ethstaker_deposit-cli
2. Make a new mnemonic
Replace <HARDWARE_WALLET_ADDRESS> with withdrawal address.
./deposit new-mnemonic --chain mainnet --execution_address <HARDWARE_WALLET_ADDRESS>
- Choose your language
- Repeat your withdrawal/execution address for confirmation
- Choose the language of the mnemonic word list
- Choose how many new validators you wish to run
- Create a keystore password that secures your validator keystore files
- Repeat your keystore password for confirmation
- Answer yes if you want to generate compounding 0x02 validator
- Write down your 24 word mnemonic seed
- Type your mnemonic, first 4 letters is enough
You will see the following messages after successfully generated the keystore(s) and the deposit(s):
                  #####     #####
                ##     #####     ##
    ###         ##   #######     #########################
    ##  ##      #####               ##                   ##
    ##     #####                 ##                       ##
    ##     ##                     ##                      ###
   ########                        ##                     ####
   ##        ##   ###         #####                       #####
   #                          ##                         # #####
   #                            #                        #  #####
   ##                             ##                    ##
   ##                              ##                   ##
   ##             ###              ##                   ##
   ###############                 ##                   ##
   ###               ##                                 ##
      #############################                    ##
                     ##                             ###
                     #######     #################     ###
                     ##   ## ##        ##   ##    ###
                     ##############          #############

Creating your keys:               [####################################]  <N>/<N>
Creating your keystores:          [####################################]  <N>/<N>
Verifying your keystores:         [####################################]  <N>/<N>
Verifying your deposits:          [####################################]  <N>/<N>

Success!
Your keys can be found at: /home/username/ethstaker_deposit-cli/validator_keys
Option 2 for Windows/Linux/Mac - Wagyu GUI
Wagyu is an application aimed at lowering the technical bar to staking on Ethereum.
As a 'one-click installer', it provides a clean UI automating the setup and management of all the infrastructure necessary to stake without the user needing to have any technical knowledge.
Download Wagyu: https://wagyu.gg
- Click create new secret recovery phrase
- Select your network
- Click create
- Write down your 24 word secret recovery phrase
- Check your phrase to confirm you copied it correctly
- Specify number of new keys to generate
- Specify your keystore password
- Specify your Withdrawal address
- Click next
- Re-type your keystore password
- Browse to where you want to save your keys
- Review information and close
Option 3 - Offline Tails with ethstaker_deposit-cli
You will learn how to boot up a windows PC into an airgapped Tails operating system.
The Tails OS is an amnesic operating system, meaning it will save nothing and leave no tracks behind each time you boot it.
1. Prerequisites
You need:
- 2 storage mediums (can be USB stick, SD cards or external hard drives)
- One of them must be > 8GB
- Windows or Mac computer
- 30 minutes or longer depending on your download speed
2. Download Tails OS
Download the official image from the Tails website. Might take a while, go grab a coffee.
Make sure you follow the guide on the Tails website to verify your download of Tails.
3. Download and install the software to transfer your Tails image on your USB stick
For Windows, use one of
For Mac, download Etcher
4. Making your bootable USB stick
Run the above software. This is an example how it looks like on Mac OS with etcher, but other software should be similar.
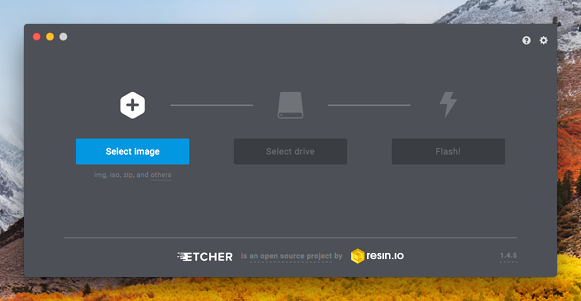
Select the Tails OS image that you downloaded as the image. Then select the USB stick (the larger one).
Then flash the image to the larger USB stick.
5. Download and verify the ethstaker_deposit-cli
Download the latest ethstaker_deposit-cli binary by referring to Option 1's steps.
Copy the file to the other USB stick.
6. Reboot your computer and into Tails OS
After you have done all the above, you can reboot. If you are connected by a LAN cable to the internet, you can disconnect it manually.
Plug in the USB stick that has your Tails OS.
On Mac, press and hold the Option key immediately upon hearing the startup chime. Release the key after Startup Manager appears.
On Windows, it depends on your computer manufacturer. Usually it is by pressing F1 or F12. If it doesn't work, try googling "Enter boot options menu on [Insert your PC brand]"
Choose the USB stick that you loaded up with Tails OS to boot into Tails.
7. Welcome to Tails OS
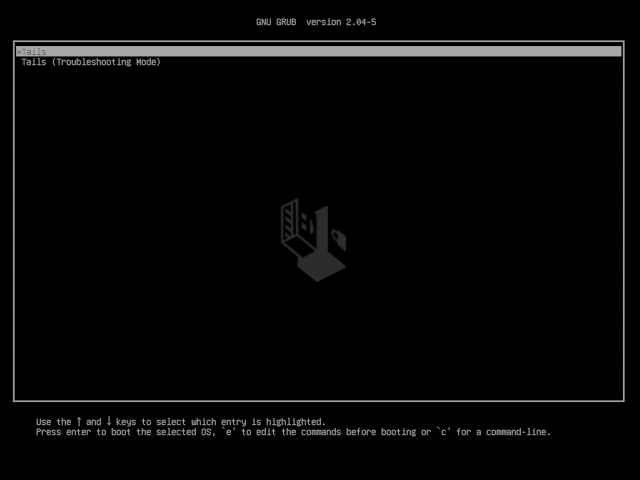
You can boot with all the default settings.
8. Run the ethstaker_deposit-cli
Plug in your other USB key with the ethstaker_deposit-cli file.
Locate the USB key, mount the drive and add execute permissions.
# Locate the usb key
sudo fdisk -l
# Create a mount point
sudo mkdir -p /media/usb-drive
# Mount the usb key. Change device name
sudo mount /dev/sda1 /media/usb-drive
# Change directories
cd /media/usb-drive/ethstaker_deposit-cli
# Add execute permissions
sudo chmod +x ./deposit
9. Make a new mnemonic
Replace <HARDWARE_WALLET_ADDRESS> with withdrawal address.
./deposit new-mnemonic --chain mainnet --execution_address <HARDWARE_WALLET_ADDRESS>
- Choose your language
- Repeat your withdrawal/execution address for confirmation
- Choose the language of the mnemonic word list
- Choose how many new validators you wish to run
- Create a keystore password that secures your validator keystore files
- Repeat your keystore password for confirmation
- Answer yes if you want to generate compounding 0x02 validator
- Write down your 24 word mnemonic seed
- Type your mnemonic, first 4 letters is enough
You will see the following messages after successfully generated the keystore(s) and the deposit(s):
                  #####     #####
                ##     #####     ##
    ###         ##   #######     #########################
    ##  ##      #####               ##                   ##
    ##     #####                 ##                       ##
    ##     ##                     ##                      ###
   ########                        ##                     ####
   ##        ##   ###         #####                       #####
   #                          ##                         # #####
   #                            #                        #  #####
   ##                             ##                    ##
   ##                              ##                   ##
   ##             ###              ##                   ##
   ###############                 ##                   ##
   ###               ##                                 ##
      #############################                    ##
                     ##                             ###
                     #######     #################     ###
                     ##   ## ##        ##   ##    ###
                     ##############          #############

Creating your keys:               [####################################]  <N>/<N>
Creating your keystores:          [####################################]  <N>/<N>
Verifying your keystores:         [####################################]  <N>/<N>
Verifying your deposits:          [####################################]  <N>/<N>

Success!
Your keys can be found at: /home/username/ethstaker_deposit-cli/validator_keys
Result: a folder called validator_keys containing keystore-m files and deposit_data.json
If you ran this command directly from your non-Tails USB stick, the validator keys should stay on it.
If it hasn't, copy the directory over to your non-Tails USB stick.
Confirm your validator_keys are on the USB stick before leaving.
ls /media/usb-drive/ethstaker_deposit-cli/validator_keys
🔥 Make sure you have saved your validator keys directory in your other USB stick (non Tails OS) before you shutdown Tails. Tails will delete everything saved on it after you shutdown.
🎉 Congrats on learning how to use Tails OS to make an air gapped system.
Result: There are two types of files generated.
| File type | Purpose |
|---|---|
Keystore file(s) [i.e.. keystore-16945983.json] |
|
Deposit data file(s) [i.e. deposit_data-16945983.json] |
|
⬆️ 3. Transfer validator keys to node
Local node: Skip this step if you generated your keys on your node with ethstaker_deposit-cli. No need to transfer as they're already there.
After creating the validator keys offline, you'll want to copy these validator keys to your node.
To align with this guide's steps, make the default validator_keys path on your node.
mkdir -p $HOME/ethstaker_deposit-cli/validator_keys
To transfer validator key files to your node from your local computer, consider using:
Option 1 - File Transfer
Option 2 - USB Key
Step 1: From OFFLINE machine, copy validator keys to a USB key.
Plug the USB key into offline machine, then locate the device name.
# Locate the usb key
sudo fdisk -l
Upon executing the above command you will get an output similar to the one below:
Disk /dev/sdc: 7.4 GiB, 7948206080 bytes, 15523840 sectors
Units: sectors of 1 * 512 = 512 bytes
Sector size (logical/physical): 512 bytes / 512 bytes
I/O size (minimum/optimal): 512 bytes / 512 bytes
Disklabel type: dos
Disk identifier: 0x00000000

Device     Boot Start      End  Sectors  Size Id Type
/dev/sdc1  *     8192 15555555 25555555 7.4G  b W95 FAT32
Mount the key. Change the device name accordingly.
# Create a mount point
sudo mkdir -p /media/usb-drive
# Mount the usb key
sudo mount /dev/sdc1 /media/usb-drive
Copy the keys. Adjust the path names if needed.
# Create a directory on the usb drive to copy the keys into
sudo mkdir -p /media/usb-drive/ethstaker_deposit-cli/validator_keys
# Copy the keys to the usb drive
sudo cp $HOME/ethstaker_deposit-cli/validator_keys/*.json /media/usb-drive/ethstaker_deposit-cli/validator_keys
# Cleanup
sudo umount /media/usb-drive
Step 2: From a USB key, copy validator keys to the NODE.
Plug the USB key into node, then locate the device name.
# Locate the usb key
sudo fdisk -l
Upon executing the above command you will get an output similar to the one below:
Disk /dev/sdc: 7.4 GiB, 7948206080 bytes, 15523840 sectors
Units: sectors of 1 * 512 = 512 bytes
Sector size (logical/physical): 512 bytes / 512 bytes
I/O size (minimum/optimal): 512 bytes / 512 bytes
Disklabel type: dos
Disk identifier: 0x00000000

Device     Boot Start      End  Sectors  Size Id Type
/dev/sdc1  *     8192 15555555 25555555 7.4G  b W95 FAT32
Mount the key. Change the device name accordingly.
# Create a mount point
sudo mkdir -p /media/usb-drive
# Mount the usb key
sudo mount /dev/sdc1 /media/usb-drive
Copy the keys. Adjust the path names if needed.
# Create a directory copy the keys into
sudo mkdir -p $HOME/ethstaker_deposit-cli/validator_keys
# Copy the keys to the default path
sudo cp /media/usb-drive/ethstaker_deposit-cli/validator_keys/*.json $HOME/ethstaker_deposit-cli/validator_keys
# Cleanup
sudo umount /media/usb-drive
After transfering the files, verify that the keystore-m files are in the proper location on your node.
ls -l $HOME/ethstaker_deposit-cli/validator_keys
Expected sample output:
-r--r----- 1 ethereum ethereum 706 Oct  1 02:33 deposit_data-1696645983.json
-r--r----- 1 ethereum ethereum 710 Oct  1 02:33 keystore-m_12381_3600_0_0_0-161664283.json
👩💻 4. Deposit transactions at the Launchpad
Only deposit the 32 ETH per validator if you are confident your node will be fully synced, which takes on average a day - check your logs, and ready to perform validator duties. You can return later to launchpad with your deposit-data to finish the next steps.
- Follow the walk-through at the Launchpad: https://launchpad.ethereum.org
- Upload your
deposit_data-#########.jsonfound in thevalidator_keysdirectory. - Connect the launchpad with your wallet, review and accept terms. Ensure you're connected to Mainnet network.
🐳 Batch Depositing Tip: If you have many deposits to make for many validators, consider using Abyss.finance's eth2depositor tool. This greatly improves the deposit experience as multiple deposits can be batched into one transaction, thereby saving gas fees and saving your fingers by minimizing Metamask clicking.
Source: https://twitter.com/AbyssFinance/status/1379732382044069888
- Confirm the transaction(s). There's one deposit transaction of 32 ETH for each distributing validator.
- Deposit Example: If you want to run 3 validators you will need to have (32 x 3) = 96 ETH plus some extra to cover the gas fees.
- Verify Deposit Contract: Your transaction is depositing ETH to the official deposit contract address. Check, double-check, triple-check that the official Ethereum Deposit Contract address is correct.
0x00000000219ab540356cBB839Cbe05303d7705Fa - Ledger Nano Hardware wallet users: If you encounter difficulty making the deposit transaction, enable blind signing and contract data.
4. Review backups
🔥 Critical Crypto Reminder: Keep your mnemonics, keep your ETH.
- Stay Offline: Write down your mnemonic seed offline. Not email. Not cloud.
- More than 1 backup of mnemonic: Multiple copies with multiple locations is better. Best stored in a metal seed.
- Verify your hardware wallet's backup: Most important of all data, this is where your withdrawal address belongs and ultimately controls the 32 ETH
- In case of recovery: Stored on a USB key, keep copies of
validator_keys directory- contains all the keystore .json files- keystore password - used to encrypt keystore files